Mostrando entradas con la etiqueta Moños de Cabello. Mostrar todas las entradas

Rosas para el pelo


Materiales
Listón de 2 cm de ancho x 1 metro con 10 cm
Aguja e hilo y retazo de tela
encendedor (este siempre lo usare para quemar o sellar las puntas del listón y asi evitar que se deshilache)
Diadema de plástico
perlitas o chaquiras


Rosas para el pelo
1.-Dibujamos un circulo mediano en un retazo de tela y, buscamos el centro de nuestro circulo,con un lapiz marcamos  un triangulo dejando 3 cm de separación.
 2.-Cortamos ese triangulo que marcamos en el anterior paso.
 3.-Volteamos nuestra tela por el lado del revés Ahora coseremos nuestro semi circulo uniendolo de está manera.
 4.-Ya esta cosido
 5.-Lo volteamos por el lado derecho de nuestra tela y así nos quedara nuestra pieza,(parece un cono=
 6.-Ahora hagamos nuestras rosas para el pelo,Ponemos nuestro listón sobre el centro que habiamos marcado antes,y ahora cosemos en forma cuadrada ,ver la foto.Sobre este cuadrado comenzaremos a hacer nuestros dobleces es la parte mas divertida :).
 7.-Este es el paso que se repetira muchas veces para formar nuestra rosa.
Sobre nuestro cuadradito que ya esta cosido ,cogemos ese mismo  listón y hacemos un pequeño  doblez poniendolo justamente en un vertice del cuadradito.
 8.-Con nuestra aguja e hilo cosemos dos puntadas en ese mismo vertice y así nuestro listón quedara pegada ,y continuaremos con nuestros siguientes dobleces.
 9.-Giramos levemente nuestra tela (circulo)y hacemos nuestro doblez ,ahora nuestro listón llegara en el siguiente vértice de nuestro cuadrado.

 10.-Con aguja e hilo cosemos con unas puntadas.

 11.-Giramos nuestra tela y  seguimos haciendo el siguiente dobles ,y cosemos.
12.-Giramos nuestra tela y comenzamos de nuevo a hacer nuestros dobleces .

 13.-Así continuaremos hasta cubrir todo nuestra tela
 14.-A medida que vamos avanzando ,los dobleces que hacemos irán mas abajo y mas abajo.
 15.-Cuando ya terminemos cortamos el listón y lo coseremos en la parte del revés de nuestra tela.
 Aqui podemos hacer un dobladillo con nuestra tela tapando todo lo cosido,o si quieres puedes pegar un circulo de fieltro .
Ahora a coser nuestras rosas para el pelo.Yo cosi  unas  perlitas en el centro de las rosas (es opcional) y eso es todo amigas ya terminamos de hacer las rosas y las podemos usar donde querramos ,no solo nos servira para el pelo ,también lo podemos usar en un vestido ,en  unas muñequeras,decorando  una cartera y todo lo que nuestra imaginación quiera hacer .
Rosas para el pelo
 Forrar la diadema
Como mis rosas para el pelo irán sobre una diadema,lo que haré sera forrar la diadema con listón,en una de las puntas de la diadema pegare un retacito de listón y sobre el comenzare a forrar mi diadema .

 Rosas para el pelo


How to Make Bows (From Ribbon Retreat)

How to Make Bows: Twisted Boutique, Pinwheel, Spikes, Surround Loops - and how to layer them! {The Ribbon Retreat Blog}

TUTORIALS FROM HERE

How to make xmas tree, pineapple and strawberry with the 'kanzashi' fold.

To make these things (in pic.1) you need to know how to do the kanzashi folds #1 and#2.

1/ Kanzashi fold #1:

Cut a square piece of grosgrain ribbon. fold it in half at the broken line shown in pic.2


Continue to fold the folded ribbon in half once more at the broken line shown in pic.3


Now as you see in pic.4 at one corner of your folded ribbon now, there are two layers. Fold the top layer on top of the other part, at the broken line shown in pic.4, following the arrow.


Now do the similar thing with the bottom layer but bring it underneath the other part instead. In pic.5 Imark some spot with A, B, C. Those A, B, C will stay at the same places through out next steps, so you can compare and have an idea what is what while we're moving on.
Now you have what is shown in pic.6. Use the lighter to melt the ribbon along AB. Once the edges of all layer along AB have melt evenly, use you fingers to press firmly and squeeze to seal them together. You would want to wrap your fingers with cotton bandage before doing this step otherwise your fingers may be hurt by the melted ribbon. YOu will now achieve what is shown in pic.7.


Pic.8 show your folded ribbon from another angle. (Please not that A, B, C stay in the same places!!!:-))


Now use your thumb and index finger to open your ribbon as shown in Pic.8


Pic. 9a show you the front side of the kanzashi fold #1

And Pic. 9b show you the back of it.

2/ Kanzashi fold #2:


Do the same as the fold#1 until Pic.3. Now instead of folding only the top layer, you will fold both top and bottom layer to one side at the broken line and following the arrow in Pic.4. Pic.12 show what you'll get


Use the lighter to seal the edges of all ribbon layers along AB, with the same methode as described after Pic.6


You now have what is shown in Pic.13


Now, Pic.14 shows you the top of the kanzashi fold#2

Use your finger to open it a bit, the same way as you do the fold #1


Pic 16 shows you the back of it.

I make the tree here with 7/8" ribbon, so the size of the tree will be about 1.5" standing up. you can also make it with 1.5" ribbon , of course it'll be bigger - up to you :-)

You will need 6 Kanzashi 'tiles ' fold #1, and one in brown, fold #1, too (Pic.17)


A piece of fun foam (Pic.18) and some ornaments for the tree as desired. I use a red star cut out of fun foam. But you can use anything that pleases your eyes. If you want to make a 3D ribbon star, I think I posted one for the starfish here, and instead of a 'funky' star, you need to cut a neat, even one for the tree, but the methode will be the same :-)
http://hipgirlclips.com/forums/how-m...-starfish.html

YOu also need hot glue and hot glue gun and a pair of scissors.


Now put some hot glue to the back of the brown piece and glue it onto the fun foam as pictured (Pic.19)

Continue to glue the green 'tiles' onto the fun foam step by step as shown in pic.20, 21, 22


Now, use your scissors to trim of the funfoam shown underneath the tree (Pic.23)

Now glue an ornament onto the top of the tree (Pic.24) . YOu've made it!


4/ Pineapple:


You will need 7 Kanzashi 'tiles ' fold #1 in orange or yellow gold, swiss dots ribbon will do nicely , and 7 in green, fold #2,(Pic.25) and a piece of fun foam


Glue two kanzashi tiles fold #2 together as shown in pic.26,27


Apply hot glue to the back of this piece and glue it on to the fun foam (Pic.28,29)


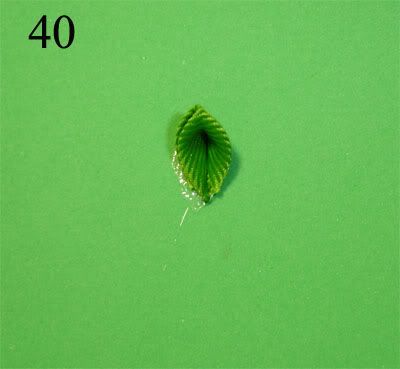
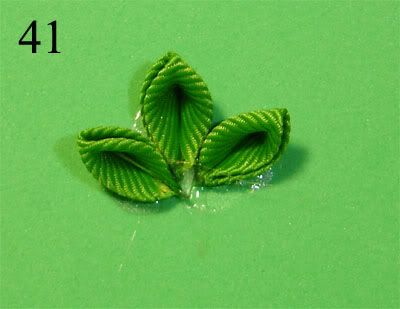
Now continue to glue the rest 'tiles' onto the fun foam step by step as shown in pic.30,31,32,33,34,35,36,37,38


Now trim off the fun foam. You've made your pineapple (Pic.39)


4/ Strawberry:


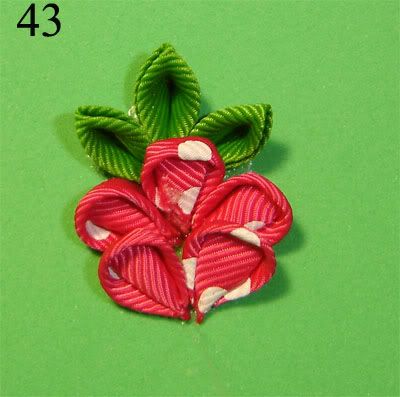
You will need 6 Kanzashi 'tiles ' fold #1 in red, swiss dots ribbon will do nicely (sorry I was not keen enough to find my red ribbon in my too messy stash so I use this hot pink. Don't worry, you just need to do the same with the red one :-) J/k) , and 3 in green, fold #2,(Pic.25) and a piece of fun foam.

The following pics will show the order to glue those tiles onto the funfoam. Once you finish, again, trim off the exccess fun foam. 


INFO TAKEN FROM HERE
THE END.