Mostrando entradas con la etiqueta Costura. Mostrar todas las entradas
Mostrando entradas con la etiqueta Costura. Mostrar todas las entradas


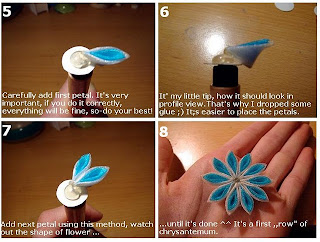


Denim Flowers Barrette

pcycle an old pair of jeans scraps into a flowerly barrette.
Items used:
Items used:
- Jeans scraps (5 12 x 12 inches square pieces)
- Scissors
- Pen
- Cardboard
- Needle and thread
- Hot Glue Gun
- Barrette blank
The scraps were taken from one of the legs of this pair of scraggly old jean.

The principal for making the flowers here is the same as the rolled paper flowers here:
http://craftsandcreationswithkathy.blogspot.com/2009/12/rolled-flowers.html
For the two outer flowers, I cut 2 12 inch x 12 inch squares from one of the legs and stacked them on top of each other, right sides up, flipped them over and on the wrong side of the fabric drew a spiral like the one below on where the spirals were about an inch wide. For the center flower, I only used one layer of fabric.

I then cut out the spirals and rolled them starting with the inner spiral outward and would stitch the layers loosely with a needle and thread. Here is the bottom view of the rolled flowers.

I put the barrette blank on a piece of cardboard and drew around it with a pen, making it slightly larger than the barrette and then cut it out.

I put the flowers with the 2 layers on each end and the one with 1 layer in the center, scrunched them together then glued the bottom of the flowers to the cardboard.

I then glued the cardboard to the barrette blank.
 
|
| http://craftsandcreationswithkathy.blogspot.com/2010/02/denim-flowers-barrette.html |
Pearls & Lace Rosette Fascinators


Supplies:
- hot glue gun or fabric glue
- scissors
- satin fabric cut to 1½ x 44 inches
- lace squares cut into 2 x 2 inches (about 12 pieces, more for a larger hair piece)
- pearl strand on the spool
- felt to match fabric color
- snap clip

Start by cutting out an oval from the felt that is about 2½ inches long. Take a lace square and pinch it in your fingers to make a little pom like shown in the picture.

Now put a little glue on the tip of the lace and press onto the outer end of the felt. Repeat around the felt as shown, with about 3 layers or until you have reached the amount of poof that makes you happy.

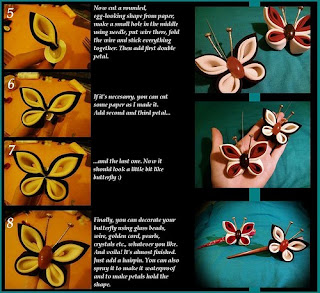
Next, the rosette. For this tutorial, I just folded the satin in half length wise and left a frayed edge. You can fold the edges in on each side once to meet in the middle and then press in half (like bias tape) if you like, but I like a little fray…such a rebel  .
.
Tie a knot on one end and then fold the little tail over and glue to the knot. Now place a little more glue on the knot and twist and fold the satin around the knot gluing as you go. I have a very detailed post on how to do a rosette here, I just folded instead of twisting for this rosette.

When you reach the end, leave about a 1 inch tail. Add a generous amount of glue to the back…

Then press the end over onto the glue.

Now take the lace and felt piece and put glue on the area of the felt that is exposed.

Then press the rosette onto the the glue and hold in place for a few seconds.

Cut the pearl strands to be three different lengths, I just hold the strand up to the piece and cut the length that looks right. Take the longest strand and glue one end on one side of the fascinator, and the other end on the opposite side like shown in the image above.

Repeat with the other two strands making sure they have a nice drape.

Now cut two small circles from the felt and glue over the ends of the pearl strands. Make sure the edges are secure.

Almost finished! Just cut a little piece of fabric and slide inside the snap clip, and snap closed. Put glue all over the back side (the opposite side of the single prong) and press onto the back of the fascinator. Hold and press until set.

There you have it – a pretty hair piece fit for any special occasion. Pretty, and simple.

Now go and make a bunch!

Here is a smaller one with the folded edges instead of the frayed. Aren’t they fun?!
If you have any questions, leave them in the comments and I will answer them there, and of course if you make any let me know or upload an image to our flickr pool – it makes my day 
fROM: http://www.themotherhuddle.com/tutorial-pearls-lace-rosette-fascinators/


Suscribirse a:
Entradas (Atom)