So here's my latest project that a crafty friend of mine introduced me to. I discovered that they go by many different names: rolled frayed fabric flowers, tattered fabric roses & frayed rosettes are a few. I'm just calling it a flower headband because I like to keep things simple. There is no sewing involved and only a few items needed. You can also use the flowers on picture frames, hair clips, bags, jewelry, and on presents.
Here's a look at the lovliness you can create...
This is what you need...
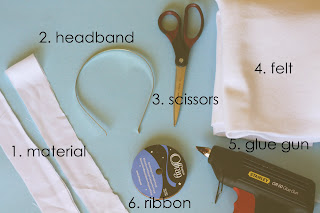
Here's what you need to get ready before you begin:
1. Cut strips of fabric about 1 1/2” – 2” wide. Mine are not precise at all. You can use any fabric to make the flowers. I used "silky" fabric for this headband.
2. I ordered the 5mm metal headband from here but you could choose another size if you'd like.
3. The ribbon that fits well on the 5mm headband is the 3/8" and I used grosgrain ribbon.
4. Trace circles onto the felt in the size that you want your flowers to be. I used objects from around the house. Then cut out the circles. You'll need 2 circles for each flower you will be making (the first circle for gluing the fabric on to make the flowers and the second to glue on the underside of your flowers).
Alright, let's get started...
Glue the ribbon to the outside headband
When finished measure about an inch of ribbon, cut, and then glue to the inside of the headband
Every so often glue the fabric to the felt. I've seen flowers made both tight and loose. These made here are more loose. It's just what you like the looks of. I made a couple of flowers before I got the hang of it and to find out how tight or loose I wanted to wrap the fabric. Just keep experimenting.
When you either run out of fabric or you've covered the felt circle completely then glue the fabric to the back of the felt. Trim any extra fabric, if necessary.
This is the back of the finished flower
Here's a pretty finished flower
Decide where you want the flowers to be positioned on the headband and then glue them on

After the flowers are glued on the top of the headband then glue the second set of felt circles on the underside of each flower
The results...
When you either run out of fabric or you've covered the felt circle completely then glue the fabric to the back of the felt. Trim any extra fabric, if necessary.
This is the back of the finished flower
Here's a pretty finished flower
Decide where you want the flowers to be positioned on the headband and then glue them on

After the flowers are glued on the top of the headband then glue the second set of felt circles on the underside of each flower
The results...
| in http://www.lifethroughthelensblog.com/2010/04/flower-headband-tutorial-and-giveaway.html |


No hay comentarios:
Publicar un comentario
Gracias por comentar!!!